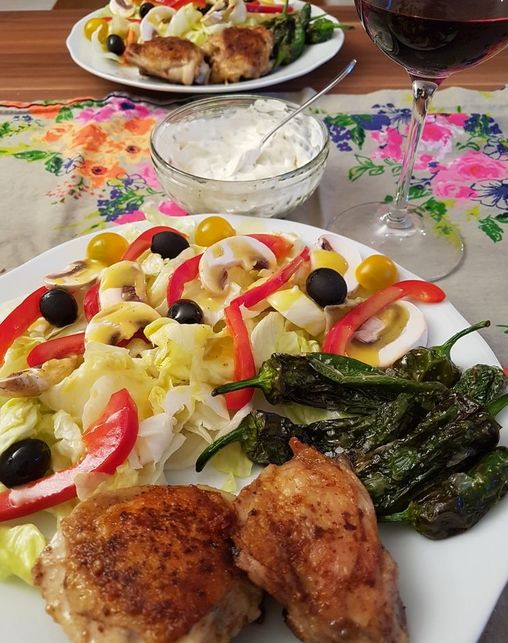
 As mentioned in my last insta post, I just love the combination of salad and chicken. They just go together like peas in a pot. Whether it is baked chicken, grilled chicken sauteèd chicken or just leftover chicken from the day before, with a nice fresh salad, it makes a fresh, light and easy lunch or dinner.
I always try to keep quite a lot of veggies at home, so when you'd check my stock, you'd probably always find spinach, pepper bells, zucchini, broccoli, cauliflower, carrots, sweet and normal potatoes, eggplant and tomatoes, lettuce, mushrooms and sometimes cabbages. I try to have at least 4 of those always at home. I just love to vary with different ingredients (I think I mention this quite often ... ;) ) So, the basic chicken and salad is always a combination of what I have in stock together with the decision, if "today is a spicy, mild, asia or mediterrean day" (those are just examples). Yesterday for example, the Ras el Hanout caught my eye and since I hadn't used it in quite some time AND it is perfect with chicken, this was the way to go... For the salad dressing I wanted something that went along with the taste, but also gave the salad a bit individuality. Hence the mustard/honey dressing I'll describe later. Most of the time, I'd add just a little bit of carbs (e.g.: some black rice, lentils or 2 small potatoes) to the dish, but yesterday we already had a rich breakfast (also on Insta!) and some lunch, so I skipped the carbs and added some Piementos de Padron instead. I was nearly done with the recipe when it occured to me that I should maybe tell something beforehand. For me, it is always very difficult to tell, when chicken is done. It can be tricky to get it right. I always start off by putting the chicken skinside first into a quite hot pan (setting 10 of 12 on my stove) and leave it without moving the pan for 3-5min. Time depends on how much chicken there is, hoch thick the pieces are. Then I reset the stove to 8 and turn the pieces. The skin should have browned some, but should not be burned. I repeat the procedure, leaving the pieces for 5 min on each side until there are no more pinkish parts. If I am not sure, if it is done, I simply stick a fork into the meatiest part of the chicken. When no pinkish juice and only clear juice comes out, it should be fine. Oh, and there is some sourcream in the pic. Thought it would be nice to go along, but actually, neither of us thought about adding it. :-) But enough of the talk and on to the recipes... Spicy "Oriental" Chicken with Salad Ingredients (serves for two): 2 chicken legs or 1 chicken breast (or whichever part you prefer, with skin (crispy goodness), ca. 100-150gr meat per person) 1 tsp Ras el Hanout 1 salt/pepper/chilli flakes 4 tsp olive oil Salad: lettuce 2 small/medium yellow tomatoes 1 red bell pepper 4 mushrooms 10 black olives Dressing: 1 tsp mustard (medium spicy) 1 tsp honey 50 ml olive oil "White" Balsamico (Condimento di Balsamico) Salt and Pepper How I did it: First rinsed the chicken under cold water, dried it with some paper towels and chopped away some of the fat. Then I rubbed the spices into the chicken on both sides. Put it aside (outside the fridge*), while preparing the salad. Wash the salad, tomatoes and bell pepper (not the mushrooms, just clean them with a brush, if neccessary). Cut the tomatoes into quarters, the bell pepper into fine stripes and the mushrooms into thin slices. I hardly ever cut the salad, but rip it into pieces that are neither too large, nor too small. Arrange everything on a large plate. For the dressing: put all the ingredients into a glad with a lid. Close the lid and shake it very well. Done.. Pour the olive oil (sesame oil works with this as well) into a pan, heat it up and add the chicken, skinside down! Leave it for ca. 3-5 min on medium heat, turn it and leave it for another 5 min. Turn again, and reapeat until it is done (see above). Take the pan off the stove, set it aside while drizzling the dressing onto the salad. Put the chicken onto the plate and it is done... *Why leave it outside? It is better, if the chicken (or any meat, really) has room temerature when prepared. Also the spices and herbs can penetrate the surface easier. Have fun! Love, CeeBee
0 Kommentare
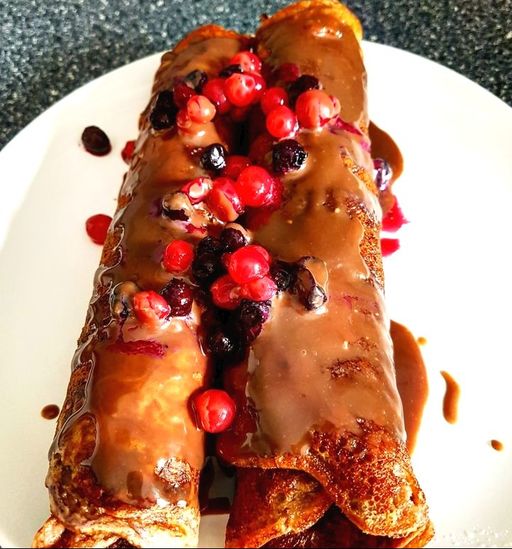 Over the last few years I sadly developed a rather strong intolerance to gluten and fructose (but only certain kinds, as it seems) as well. I bake lowcarb/high protein bread myself to avoid wheat and it works very good. I'll write down the recipe in a later post (even if the pics might not be that good looking…) Paired with the fact that I also try to cut down on carb intake and try to avoid processed foods and sugar, creating something sweet for breakfast can be quite a challenge. But Bae and me both sometimes have a sweet tooth, so I tried to come up with an alternative to normal Crêpes, which are done with wheat flour. Also to avoid sugar and readymade sauces, I wanted to come up with alternatives for this as well. I replace most of the wheat flour with almond flour (sometimes blanched and finely chopped almonds are also declared and can be bought as “almond flour”, but I mean actual flour). For baking, a working alternative for gluten, which is also functioning as „glue“ keeping dough together, is e.g. oat bran or oatmeal. So on to the recipe! Crêpes with homemade Caramel Sauce and Berries Ingredients: Crêpes - 3 eggs - 50 ml cream - 150 ml milk (maybe more) - 100 gr almond flour - 60 gr spelt (or wholemeal) flour - 50 gr Xucker (or Xylit, Erythrit)* (optional: 1 tsp baking powder) (optional: 1 tsp unsweetened cocoa powder) Caramel Sauce: - 50 ml milk/cream - 1-2 soupspoons coconut oil - 50 ml honey (optional: 1 tsp unsweetened cocoa powder) Berry Sauce: - 50-75 gr mixed berries (fresh or frozen) - 50 gr Xucker - 50 ml water How I did it: Crack the eggs into a deep bowl, add the Xucker and all the liquid ingredients Whisk with a mixer until it looks fluffy (tiny bubbles) Add the flours and blend it all together. It should neither be too liquid, nor should it have the texture of dough. If one of those should be the case, don't panic! Either add some milk or add some flour (best do one soupspoon each time) until the texture seems right. If you want them to be a bit chocolatey, add the cocoa powder, if you want them to be more like pancakes**, add the baking powder. If you want both, just add both ;) Put aside, but outside the fridge for ca. 15-20 min. In the meantime you can prepare the Sauces. For the berry sauce, put the berries into a pot, put the water in as well. Boil the mixture for 5 min, reduce the heat, put the Xucker in and stir it. Done… For the Chocolate/Caramel Sauce: Pour the honey into a deep pot, heat up until it boils and let it boil for ca. 6 mins. Take of the stove and stir the rest of the ingredients carefully into the honey. But back onto the stove and let it simmer for about 15min. If you want to add a chocolate taste to it, either melt 25gr dark chocolate and pour it into the mix or add 1 tsp of cocoa powder. When this is done, heat up a large laminated pan. Drizzle a soupspoon coconut oil into it. With a ladle pour some of the dough in, spread it until it is very thin and looks like a Crêpe. Leave it for about 4 min, check if the Crêpe is done enough to carefully flip it. Bake on the other side for another 4 min. Take the Crêpe out of the pan, put on a plate. Repeat until all the dough is used up. Take out two plates. Place a Crêpe on the plate and place some of the berries and the Caramel sauce on it and wrap the Crêpe. Drizzle the two sauces on top of the Crêpe wrap. * the great thing about this Xucker stuff is: it contains NO bad carbs, and does not raise your insulin ** if you do pancakes, maybe you can't do the wrapped version like in the photo, in this case, just pour the sauces over the pancakes Enjoy and love CeeBee 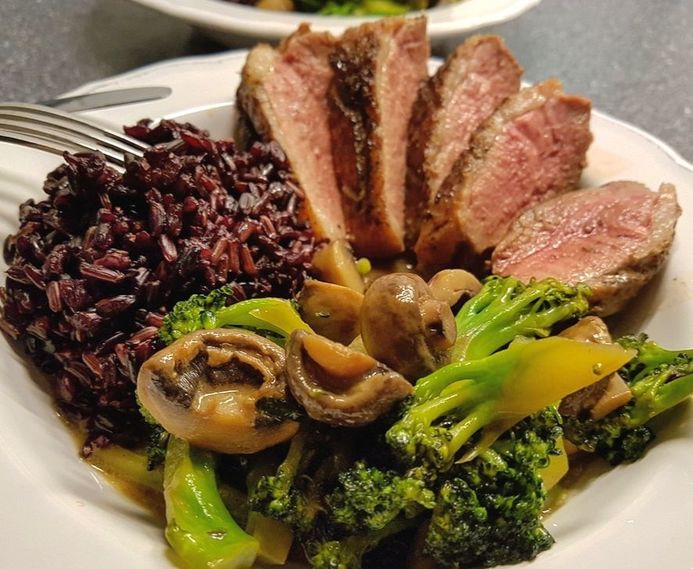 When I first tried to cook an at least a bit decent duck breast, it nearly ended with me in tears, a heartfelt oath "never ever to allow this vicious thing in my kitchen again!" and a less than tender duck breast. To cut a sad story short: it was not good, really really not good.
But my partner and me both love duck breast, so I kept on trying. After some more trial and error I finally produced a meal both incredible good looking, tasty and really easy to make. So I decided to share this recipe I invented with you all. Again with this recipe, I did not really weigh the exact amount of Veggies I used, because I tend to cook a bit more, so that there might be leftovers for me to bring to work and eat there. Asia Style Duck Breast with Broccoli, Mushrooms and Black and Brown Rice Ingredients (for at least 2 servings): - one whole duck breast (at least 350 gr, 400 gr would be better, frozen or fresh) - 1 cup black rice, 1/2 cup brown rice (uncooked) - 1/2 broccoli - ca. 200 gr. Mushrooms - Soy Sauce (the salt reduced version), Teriyaki Sauce and/or Hoisin Sauce - Garam Masala powder, salt, pepper, Curcuma, Curry powder - fresh galic (1-2 cloves) and dried chillis - green Curry paste How I did it: If the duck breast is frozen = thaw first, best would be over night I always remove a bit of excess fat (don't throw away!) from the breast and criss/cross the skin with a knife down to the meat, without damaging the meat. 4x4 cuts might be enough. Rub a mixture (1/2 tsp of each) of salt/pepper and Garam Masala all over the duck breast. Leave it outside the fridge while preparing/cutting the veggies and the rice. Prepare the rice: put the uncooked rice in a pot and use twice as much water as rice. So, with this dish it was 1.5 cups of rice and 3 cups of water. I always add some salt, Curcuma and Curry powder (1/2 tsp of each). Let it slowly boil/simmer until all the water is gone. The rice should be done by then. Cut the broccoli up and cut the mushrooms into 4 pieces. Finely dice the garlic cloves and cut the cilli (larger pieces = easier to remove), put aside for later. Put the duck breast with the skinside down into a Wok (a pan will work too, but it should be one with high sides) and heat the Wok up. Also, add the fat you might have cut away earlier. Let it sear without turning for ca. 5-10min. (medium heat 6-8) is perfect. When time is over, turn the breast and repeat the procedure for another 5 min. By then, the skinside should be brown and the other side should have taken some colour, too. Take out the meat, wrap it tightly in tinfoil and put aside. Remove the rest of the excess fat, but keep the melted fat in the Wok. It carries all the aroma from the roasted duck and the spices! Sear the garlic and chopped chilli in the Wok for ca. 2 min. Put the broccoli into the Wok, add some Soy/Teriyaki Sauce (ca. 1-2 soup spoonfuls), 1 soup spoonful green Curry paste and ca. 50ml water. If you like it a bit sweeter, also add 1 spoon of Hoisin Sauce. Let the broccoli simmer for ca. 10 min. Then add the mushrooms and let them simmer for another 5-10 min. Taste the sauce, if it needs additional seasoning, but be careful with the salt! Soy sauce already is very salty, as is some of the Curry paste. If it is too salty or spicy: you can add some coconut milk or cream. At the same time, I heated up a small pan, unwrapped the duck breast and put it in the pan. Meatside first and then for the last 5 min. skinside down to make it all crispy. Arrange the rice and veggies on a plate and cut up the duck breast (4-6 slices for each). The meat should be juicy and rose coloured and the fat should be browned and crispy. I hope you enjoy this! Love CeeBee I have always been passionate about food.
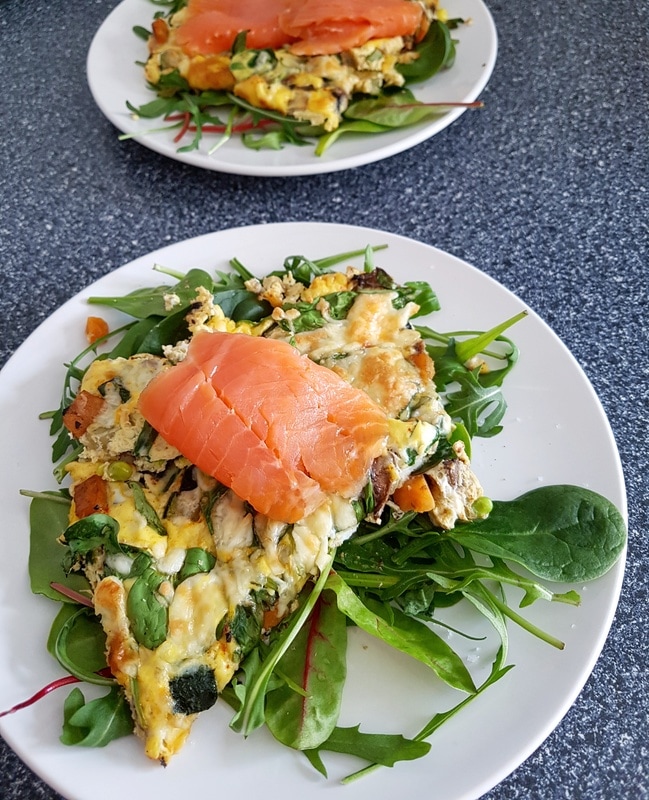
My parents are to blame for that. They showed me early on how to do things and how to combine flavours and spices. I love trying new things, experiment with different ingredients and dishes from all over the wold. All in all I really believe that trying out and just 'do' is sometimes better than sticking strictly to a recipe when one has the feeling that some measures or spices just don't add up. So, for the start and as first recipe (maybe inspiration is better) something light and lowcarb for an Easter brunch: Spring Tortilla with smoked Salmon and fresh Salad (4-6 servings) - 3 eggs - 1 small zucchini - ca. 75 gr sweet potato - 2 handful of baby spinach - ca. 50gr peas - some mushrooms - grated (meltable!) cheese of our choice (min. 75gr… but can there ever be enough cheese?? ;-) ) - up to 6 slices of smoked salmon - mixed green salad - 50ml cream and 50ml milk - salt, pepper, smoked pepper powder, curry - for the dressing: salt, pepper, condimento bianco or lemon juice, olive oil How to do it: I chopped the zucchini ito rather small pieces and the sweet potato into slightly bigger ones. No real reason, I just like how it looks. Roasted them for ca. 10min in a pan with a bit olive oil. Spicing things up with salt, pepper and the smoked paprika powder. Preheat oven to 175 degrees celcius. While it roasted, I cracked the eggs into a bowl, added the milk/cream, salt, pepper and curry and also half of the cheese. Stirring it up and adding the mixture from the pan to a quiche form. Topping it up with the half of the egg mixture and adding the spinach, mushrooms a peas. After this, I add the rest of the egg mixture, some more spices (if I have the gut feeling there should be more ...) and the cheese. Into the oven for least 15min. While it bakes, I prepare the plates. Adding a handful of green salad, sprinkle it with olive oil, condimento, salt and pepper. Keep the dressing simple and reuced, else it just overloads the Tortilla. When the Tortilla is done (cheese has browned and the Tortilla has raised a bit), I take it out of the oven, cut it into slices and place a slice on each plate ( on top of the salad). A nice slice of salmon on top of each slice and voila: Done! |
ABout me
Archiv
November 2018
Kategorien |
 RSS-Feed
